Showing posts with label Studio Equipment. Show all posts

Friday, November 4, 2011

Studio Update: Putting on paint and pushing it around.

It's that time again, Friday! which means it's time to recap my week and give you a studio update!


Do you remember 'Valentine and her cat'? They went to the ball last week in a little collage number.  They both got undressed {the collage was not glued on} ready for some paint. Being a painter through and through, I decided that I wanted to replicate {in paint} the William Morris dress and also the crown, I'm always up for a challenge! But before I could even attempt to paint a collage with paint, I needed some nice new fine liner detailing brushes because all the little ones I owned had a stray hair here and there and were driving me nuts.


This is how it has come up so far, I'm very happy with the dress, I see the potential in the crown {it will need a layer or two more} and I'm a bit hesitant with the pink/magenta of the wall. Who knows, that may be gone next week or it may grow on me.


Do you remember the 'He Loves me' painting from a few weeks back? Well I decided it looked more like he loves me not, so I've done a total rework! Still a lot to go on it, especially on the hands and arms.This one I was pulling my hair out over, but  I have faith it's going to be a fantastic painting when it's finished, a very different painting, but one I'd be happy to my name on!


After all that putting on and pushing around paint, here's what my palette looks like!

Don't forget to check out..


...feel free to add your blog.


I'm linking up with


and

BWS tips button


Tuesday, November 1, 2011

New Brushes!

Pin It
I splurged today and got some new brushes, I seem to be going through the small detailing brushes at the moment. They are usually the first to go, even more so with my new gesso. It's been a while since I got the single ones from an art shop though, I often use the cheap taklon ones found in packs of 12 or so in various shapes and sizes, you know the ones with a stray hair here and there! You may be looking at the photo and questioning the one on the left, what type of brush is it?  It's technically not a brush, but a colour shaper {used in pastel work}.  I thought I'd give it a go for taking off paint, it looked more effective to me then my worn down hog brushes, because it comes to a point. {I gave it a try when I got home, and I was right, it works a treat!} So here's a list of the brushes I purchased, left to right:


  • TAPER POINT #6 Colour Shaper
  • ROUND #0 Francheville 424 Pure Red Sable 
  • SHORT LINER #5/0 Jasart White Taklon
  • SHORT LINER #10/0 Jasart White Taklon
  • ROUND #3 Francheville 424 Pure Red Sable 
  • ROUND #0 Art Basics 95-R Still Synthetic
  • ROUND #4 Jasart Series BW170 Sable Hair 

Wishing you all a productive week, Tracey xx

Thursday, October 27, 2011

She got the chop...

While I was cutting wood today to back a few of my recently finished paintings...


... I took the opportunity to trim off some of the top of my "He loves me" painting. 


It was poor planning on my behalf, but I think the composition is a lot better now.


Sometimes you just have to make that call! 


A step by step of how I back an image can be found here:

Friday, September 30, 2011

My Painting Process


I've had a lot of interest and questions about the process I go through to make a painting. So while I was painting last months MPC image 'In the Backyard' I took a few snaps while I was working away to show you how I go about making an image. You will have to forgive some of the photos, as they were taken at night with wet oils and are not as crisps as I'd like.


 Priming the Board

I have started to used a green mid tone acrylic as my starting surface instead of painting straight onto the white, this allows me to see the highlights better and makes for a more dramatic painting, so I started this one in the same way. Above you can see my boards primed. For this months MPC I cut my usual board size in half because I knew I would be pushing it to get the piece finished on time and I also had in mind to paint my other nephew in a similar pose down the track.


Sketching the image

Then using a graphite pencil I blocked in large areas of light and dark and did a general sketch to work out where the figure would sit in space. This is a kind of paint by numbers approach, but I find it helpful to work out things at this stage, previously I worked it out with paint and lots of painting over and re painting areas just a bit smaller or moving the whole subject to the left happened. This way it saves time and paint. Also working in oils, it is a lot harder to paint out areas, much easier to erase to reposition or change the image.

Laying out my paint

I work in a pretty limited palette, above are the colours I used for the 'In the Backyard' painting.

Laying out the Mediums

I use Liquin and Smooth Gel Medium to alter the paint and increase the drying time. I'm liking the thickness and gloss the Smooth Gel Medium is giving the paint, it allows for a nice buttery finish.  I'm also a big fan of Liquin, it's a thinner medium that allows for transparent layers of colour with the bonus of a fast drying time!
 
Mixing the skin tones

I then mixed up the skin tones in a light, medium and dark tone (with the dark I mix a warm and a cool).

Blocking in the Figure

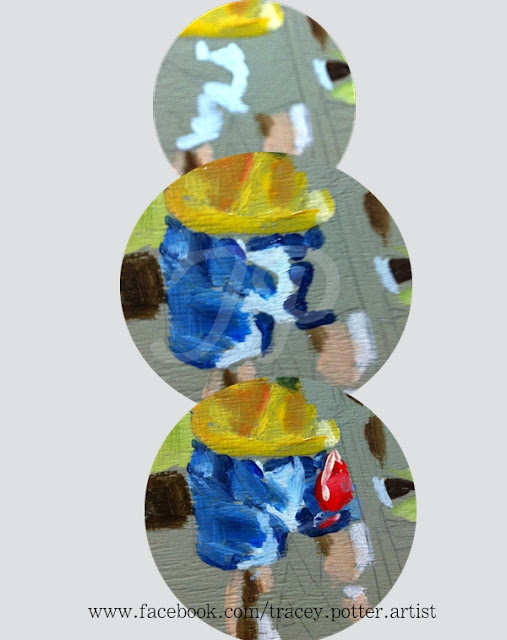
Using the round taklon hair brush (1.)  I blocked in the light areas observing the photograph as I went. I then did the same thing for the dark and then the mid tones on the figure. Brushes 2. and 3. 
(also taklon) were used for taking paint off and defining edges. I then tightened up and worked
more detail into the face, as seen in the circle above.

 Mixing the Yellows and painting the Shirt

Following the same principal of mixing the light, dark and mid tones of the object, I blocked in the shirt, observing the photograph once again.

 Painting the grass and sky.
It was then time to tackle the background, mostly to define the edge of the shirt, bear and face. I laid down a green, observing the edges and negative spaces shown in the photograph. I also took the opportunity to block in bits of blue in the sky.

Painting the Shorts

Again following the same principal of mixing the different values and blocking in the general colour, I painted the shorts.

 Detailing the Teddy
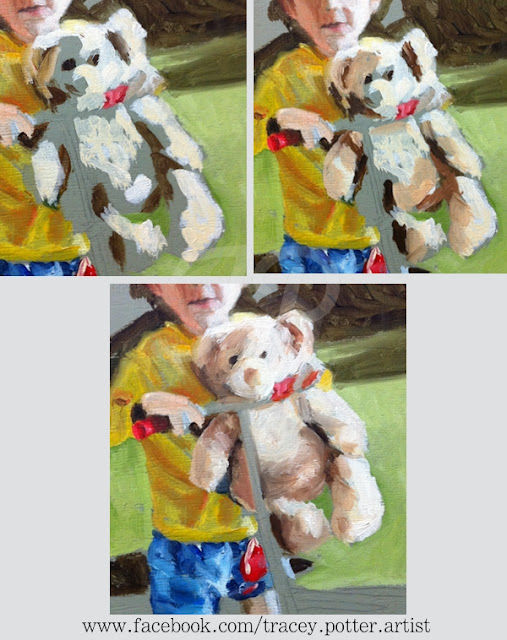
I then worked up the teddy adding more detail with light, dark and mid tones, as before.

 Detailing the Grass

Time to get out the scratchy brush! I added a layer of dark green over the grass
and scratched back into it with the synthetic hog hair brush (above), removing some of the paint for the blades of grass. Using the same green I then blocked in the general area of the trees, observing the photograph as I went.  I didn't get a photograph of it, but I followed the same light, dark and mid principle with the pavement/pebbles, as seen above.

Detailing the face 

I then added some more detailing in the background, observing the photo, but just blocking in a general indication of the trees. I then got out the finer (Taklon, round) brush for some detailing of the face. You can see my struggles below.


I pushed around paint constantly observing the shape, value and temperature of the face, I wanted to achieve a 'likeness'.


As you can see above, the scooter base and legs/feet have not got any paint yet! So I mixed up the paint and blocked in the shapes.  All the photo's I took of this stage are extremely out of focus and not usable :(  Below is the final result.


Monday, July 11, 2011

Look Mum, I got a new toy!

A little while ago I was watching this video on getting the likeness in portraiture and the tutor was using calipers for measuring the proportions, and I thought I need to get me one of those. For the last few weeks I've used one I made with two brushes and a rubber band, it worked well, but when I saw these today I had to buy them. 2 for $2, how could you go wrong?


They work great for small measurement, but any larger then 7cm and you are up a creek.  I will be using them for smaller paintings and using the makeshift brush setup for my larger work until I come across the 'real deal'.  Just wondering does anyone else use calipers for their work and also does anyone know where to get an artist caliper from like in the video?

Hope you all have a productive week.


Amended: I forgot to mention they are Cheat Chopsticks for eating Sushi :)
Come Visit me on Facebook: http://www.facebook.com/tracey.potter.artist

Wednesday, July 6, 2011

My Favorite Brushes.

I've been getting a lot of use out of these 7 brushes lately. Most of them are great because they are so versatile and can be used to create a broad or fine brushstroke. As you can see from the photo below a continuous line can go from thick to thin with these brushes, it all depends on how you hold the brush and how much pressure you apply. 


Below I mention the brand, hair fiber and hair shape of each brush and what they are good for.


1. Roymac Revolution Taklon Mitre
Great for broad to fine brush work.

***


2. Franchville Taklon Comb
Great for Hair!

***


3. Jasart Golden Taklon Filbert
Great for broad to fine brush work.

***


4. Neef Indian Sable Bright
Great for broad to fine brush work.

Source
***


5. Neef Synthetic Hog Filbert
Great for broad to fine brush work.

***


6. N.A.M Goat Hair Calligraphy
Great for broad to fine brush work.

***


7. Roymac Goat and Synthetic Blend Mop
Great for blending (used dry)


Do you have a favorite brush(s) that you use?